Hello! If you've found your way here, it may be safe to say you are a hunter or know a hunter. My family loves hunting and fishing, and I personally do all of our game processing. A long, long time ago, I did have a blog on how to cut up a deer, but sadly, I hosted my photos elsewhere. It's been long overdue, but here is another rendition of "How to Process Your Deer at Home".
If you've ended up here and are not a hunter or hunting enthusiast, or do not wish to see how to turn a deer into food, please kindly check out another blog. This blog will include graphic photographs - this is part and parcel of how any sort of meat ends up on a plate. This is your warning.
If you believe you are in the right place, remember this: Just as there is more than one way to skin a cat, there are many, many tips, tricks and methods for processing a deer. This is merely the way I choose to do it. If you prefer another way, or someone else decides a different way is better, by all means try it. This just happens to be the way I was taught, and the way that I prefer to process.
(My daughter and I with a 2012 buck I shot)

First off, this is starting with the ideal that you have already field dressed your deer. I always rinse out the cavity with cold, clean water.You want to make sure you've done a good job of clearing away any fecal matter, urine, gut contents, and as much blood as is reasonable.
I prefer to hang from the hind legs using a gambrel hook set. You can get this as Walmart for under $20, just make sure you have them set up on a beam that can hold about 300+ pounds.
You will want to hang your deer in a shady area where critters cannot get to it. We use our garage. Even if it's cold out, hanging in the sun can allow the carcass to heat more than is safe.

The first thing to do within 24 hours of shooting your deer is to remove the tenderloins - sometimes called the inner loins. These are located on the inside of the ribcage. Be careful when gutting so you don't mangle these. They are easily the most tender parts of any deer, and many people forget them. The the picture below, they are the dark red lengths on either side of the spine. They begin near the pelvis, and end partway along the ribcage.

You will need to make a cut near the top part of the tenderloin muscle, and from there you can use your finger to work it out away from the ribs and spine. That first cut is usually all that is needed for knifework.

Here you can see the tenderloin on the left side of the photo is intact, the one on the right side is hanging down and is nearly removed. Pull it out, and then remove the second one. That's it! Cook it up using pretty much any method you wish, but I suggest treating it like it really is - the filet mignon of the deer. High, quick heat, cooked to medium to medium rare, and chow down!

The next step should take place either at 48 hours or up to a week later, depending on your climate. If your daytime high temperatures are under 45 degrees you can go for 4-5 days. If they are staying below the mid 30's you can hang for a week. The longer you hang, the better the meat quality will be. This isn't as much like the "aging" of beef in which the fat is expected to break down and penetrate more, but rather this is allowing the muscle tissues to go through an enzyme process. In short - the longer you SAFELY hang meat, on the bone, before cutting the muscle tissue, the better. I have had a deer hang for over a week, and then rest in the refrigerator for a week (quartered and wrapped), and it was the best venison I've ever had.
Good venison has just a slight smell to it - it should not smell rank, gamy or sour. If it does, don't trust it.
Back to cutting up....
I make all my skincuts first, so I can brush away the hair and limit the amount of hair that ends up on the meat. The first cuts are around the hind legs, below where the gambrel hooks come in. Be sure to carefully cut the skin around the tendon. You don't want to cut the tendon, otherwise the leg will come out of hook, and you'll have a heck of a time!

I also cut the front legs off just above the knee. I use a folding saw that came with a butcher kit from Walmart. You can use a hacksaw, trim saw, Sawzall, anything you want!
At this time, you can either choose to cut the whole cape out, or you plan on having the deer mounted, not cut the cape. This deer skin is going to a taxidermist friend, so I do not want to cut the chest, neck and front legs. If you don't care, go ahead now and cut from where you gutted all the way down the chest and the neck. Also cut the front leg skin, starting at the chest cut and going straight down the back of the legs. Brush the hair all off.

Both hindlegs have been skinned around and now it's time to skin them out. Run the knife along the inside of the leg, all the way to the cuts made when gutting. Do both legs, and brush away the hair. The more hair you get off at this point, the less hair on the meat!

Start peeling the skin off the leg. Use the knife to help separate the skin off. It will come off with some tugging, and there will be some membrane attachment.

Continue pulling the skin off around the haunches. It will hang up on the tail. Once you get as far as you can, skin

Pull the skin off the other leg, until it too is skinned out to the tail.

Use the saw to cut through the bone of the tail. It shouldn't take much!

Grab on the skin and pull it down. You may need the knife the free up the membrane. I like to reach my hand under the skin and grab hold of the hair side when I pull - it's much easier to hold than the flesh side. Skin all the way down to the shoulders.

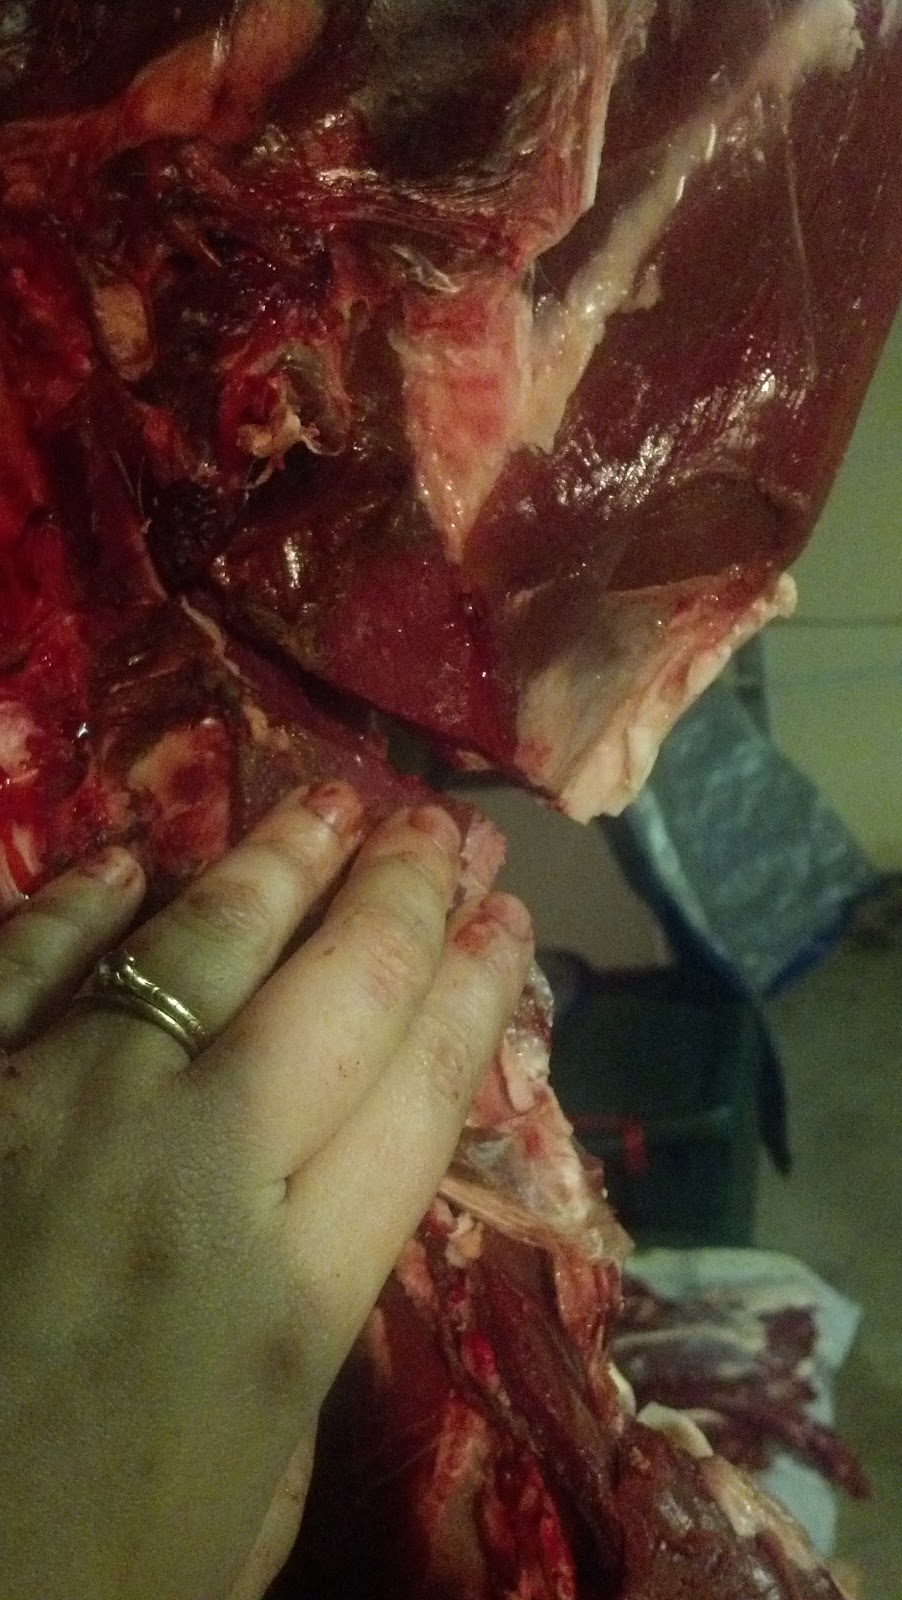
When you get close to the shoulders, slow down. You will need to make sure you are skinning over the shoulder meat, and not cutting the meat off the deer with the skin. Below, you can see my hand in between the shoulder and the body (also can see where I shot the deer).

Continue skinning down over the shoulders. Again, this cape is going to a taxidermy friend, so I am specifically NOT cutting the brisket or the front legs. I want to allow the taxidermist to decide where and how to make those cuts when mounting, giving him the opportunity to make a cleaner mount with less sewing.

About this point, it's hard to skin any farther because of the legs. I make a cut around the shoulder and pull the shoulder off. The front leg of a deer is not attached to the body by any sort of bone, only muscle. I start by freeing up the front legs from the skin - carefully run the knife around the front legs from the knee end. This will help me pull the leg skin off.

Once I free the skin of the leg, I can skin down the leg, and pull the skin off like I'm pulling an arm out of a shirtsleeve.

Once I've sleeved the leg out, I just cut the shoulder off by holding it away from the body and cutting the connecting tissue. Just cut the silvery stuff. This picture is fairly bloody because I shot through the shoulder. Usually there isn't much blood at all, and it will come apart easily. The only meat to cut will be near the backbone, where the muscles hold the shoulder on. The shoulder is barely hanging on here:

The leg is totally removed..

A shot of the sleeved out front leg skin. There are no cuts made, it's just inside out.

Both shoulders have now been removed using this process. You can somewhat see the inside - out front leg skin.

Skin down the neck now. With the front legs gone, skinning will be easier, just continue on down. There is a lot of muscle attached to the skin, so take your time and don't worry about some of the meat hanging to the skin, just do your best.

It will get harder to skin the farther you go. Just get as far as you can. Once you're nearly to the head, just cut the neck meat around until just the neckbones are holding the head on. I have my fingers sticking in where I cut around.

Cut the neck bone with your saw.

Go up to the base of the neck and cut around the neck again with your knife. Carefully cut the neck bones again with your saw. This will be a neck roast - my favorite crockpot roast. Many people don't keep this, and they're missing out BIG TIME.

Backstrap time! I start the cuts below the pelvis, you can feel the bone. Just cut in and try to trim some of the fat and tissue off the muscle.

Cut along the backbone on each side, all the way to the rib cage.

There is a layer of silverskin on the backstrap muscle, and one over that. Use your finger and the knife to free the thick layer of tissue off the backstrap.

Once you free that thick tissue off, start at the top and cut to release the backstrap off the backbone and ribs. If you pull it, you risk tearing it and leaving meat behind. A small knife works great - I use my Pampered Chef knife - it's $1 and I can sharpen it all I want. Sometimes it's helpful to have someone else hold the backstrap as you free it from the ribs, because once started, it will start to pull on it's own.
The layer of silverskin on the backstrap will be removed later.

Repeat the process on the second side.There is a bit of meat between the ribs, if you want to spend time picking this off, go ahead. I usually let my chickens have it though!

Time to cut off the hindquarters! Make a cut along the bottom of the meaty part, cutting to the pelvis. The aim will be to cut all the meat off the pelvis, until it's only the hip socket holding the leg on.
Make sure to cut along the back to free the meat off the backbone and back of the pelvis.

This is a closeup of the hip socket as seen from the "front". Once you cut all around and get all the meat freed up, you'll come to this part. It's pretty shiny and smooth. Don't cut it yet. Just to the right of the "ball", you'll see a strip of white tendon. My thumb is nearly touching it. Don't cut this!

This is actually the back of the deer, with the hindlegs completely freed of the pelvis and back.

Remember that thin strip of tendon? Carefully cut it. If everything is freed up, it will release the leg from the carcass. If you have someone handy, have them hold the carcass and gently lower it, otherwise you may knock yourself with it, or the leg will go flying. Repeat on the other side, and watch your toes - the carcass will drop hard, and the legs will swing. Here are the legs hanging.

I like to put all of the edibles on a garbage bag on any flat surface I can find. Here's a picture of what you should have, along with the tools you used to get it. At the top are the backstraps, then the two shoulders, the neck, and the two hind quarters. The knifes and sharpener are there, and I have more detail on them below.

At this point, you can either cut up the meat from the legs, or store in the fridge and age, or freeze. Here is a hindleg I've wrapped with saran wrap to age in the fridge for a few more days (it was too warm to hang for long).

Time to make steak! Or time to make whatever you want - burger, roast, sausage, etc etc etc.
Here is pretty much everything you would possibly need. The bonesaw on top isn't really needed for this point, but it was there :) The cutting board is a new one, as I broke the other cutting board between deer! The second knife down is a fillet knife, then a Cutco knife, then a Pampered Chef $1 paring knife. The yellow object is a knife sharpener I really like - it's got a coarse and a fine side, and it was all of $5. Choose a sharpener you like. A dull knife will make this process a lot more difficult, and you will run the risk of hurting yourself!
Here is pretty much everything you would possibly need. The bonesaw on top isn't really needed for this point, but it was there :) The cutting board is a new one, as I broke the other cutting board between deer! The second knife down is a fillet knife, then a Cutco knife, then a Pampered Chef $1 paring knife. The yellow object is a knife sharpener I really like - it's got a coarse and a fine side, and it was all of $5. Choose a sharpener you like. A dull knife will make this process a lot more difficult, and you will run the risk of hurting yourself!

This is a hindquarter. There are two obvious muscles, carefully make a cut between them on the white part, that separates them. The film over the muscles will separate, and you can start feeling your way between the muscles.

From that cut, you can start peeling the muscles apart, using your knife to free some of the connective tissue. Whereever the muscles joins a bone, cut through the tendon.

You can pretty much peel out the muscles going around the hind leg. Continue on until you free all the muscle groups. You should not have to actually cut through a muscle. Just separate them out. Deep inside, you'll find all the bloodvessels and "stuff". All of that can be trimmed out.

The round roast is the muscle that is attached closest to the femur bone. Just cut it off the bone.

The round roast also is attached to the joint, just cut it right off. My fingers are where I made the cut.

All the meat is freed from the bone, and the main muscle groups are separated. Remember, you are just separating the muscles, not cutting them in pieces yet.

Cut the "calf" muscle off the bone as well. Same process - cut the tendons off where they meet the bone.

Once that is all done, it's time to remove the silverskin and other white stuff. Use the fillet knife to "skin" off the silver, just like you would with a fish. These are the various cuts you end up with.
A trimmed out round roast. There are a few lines of silver in it, but since this is a slow cooking type cut (roast), it's ok.

Parts of the hindleg muscles. You need to trim the fat and the white silverskin off. I use the two outside muscles for burger, and the middle for cutting into steaks.

Cleaned off and ready to cut into steak!

The "butt" muscle! This can be steaked out or burger. First however, trim off the dark parts that were exposed to air while it was hanging. I usually fillet them off. Most of them are off in this picture.

Some venison steaks!

Shoulder time! Now, while I made a great shot on this deer, I did shoot through both shoulders. You should always trim out and not use any meat that is in contact with an entrance or exit hole. Too much hair and dirt contaminates it, and if you're shooting lead, the lead particles can come off in there. Just like you shouldn't eat lead paint, it's not a good idea to eat lead pieces with your meat.

I start by carving around the shoulderblade. In the above picture, you can see the whitish line - that's the ridge of the blade. Cut on both sides, and free the meat off the blade.

Flip the leg over and again free the meat off the back of the blade. The goal is to again cut all the meat off the bone before taking the steps to cut the silver and fat off. Just let the muscle and bone show you where the cuts are needed.

If you don't shoot clean through the shoulder, you can trim off the muscle group between the shoulder blade and the elbow. In this case, there is too much damage and contamination to make it worthwhile. The chickens can have it.

Go through and follow the same process with the fillet knife and trim the silver off. I use all of the shoulder for burger meat. I like my burger meat to be very, very clean, no silver or fat on it at all.
Now for the super tasty part - the backstrap. The easiest way I've found is to cut it almost in half with the fillet knife, and then before cutting through, turn the knife sideways. The goal is to fillet the tough silverskin off the back of the meat. Use the fillet knife to do this.
Now for the super tasty part - the backstrap. The easiest way I've found is to cut it almost in half with the fillet knife, and then before cutting through, turn the knife sideways. The goal is to fillet the tough silverskin off the back of the meat. Use the fillet knife to do this.

Once you fillet the one side off, fillet the other side the same way. You should be left with two large hunks of meat with very little silverskin, and a long piece of silverskin. If you left some hunks of meat on the silverskin, just fillet them off and add them to the burger pile

You can leave these whole, or cut into 1" steaks - I usually cut into steaks, and freeze a little over a pound per bag.
The neck is very easy to take care of, and it's a pity more people don't use it - it's the best crockpot cut there is, and the easiest to trim!

To trim up, just cut through the line where the muscles around the windpipe and esophagus are. This show shows the one side cut off.

This is what you get with the esophagus/windpipe section cut of.

I filleted off the big hunk of fat on the neck, and most of the bloody film. It does not have to be as clean as the rest of the meat when it comes to the silverskin and fat - this is the only piece I am lazy on. To cook, put it in a crockpot with some potatoes, onions and carrots, some pepper and salt, maybe some beef broth, maybe some home canned tomates, fill with water and let it go on low all day long. All the little neck muscle pieces will fall apart and you'll end up with a load of bitesized meat in a yummy stew.


This post is linked up to the :The Simple Lives Thursday Blog Hop #126
7 comments:
Thanks Jen Appreciate your informative blog :)
Thank you!
A very informative blog and great job describing and illustrating the process. I do things pretty much the same way but I have a few differences I will share as alternatives (not better or worse just different). I separate the muscles of the hind quarters as I remove them from the bone while the carcass is still hanging. I find this easier because you do not have to worry about the carcass crashing down on you. What you end up with is just the lower legs and the skeleton hanging. I then cut the tendon and drop the skeleton. I turn all of the hind quarters into steaks. My family likes steak better than roasts so I make it all steaks. I also turn the neck into burger along with the front shoulders and lower rear legs. Most of the time I have my burger turned into summer sausage because I like that on sandwiches better than I like the burger. Finally, I always keep the heart. If you slice it thin, bread it, and fry it you get a very yummy addition to eggs with your morning breakfast. The heart is the only organ I keep.
Hello Jen! Gosh, I cannot thank you enough for this wonderful tutorial. It has been a while since I processed a deer and I needed a "refresher course" - and I found it right here! I learned to cut meat as in the meat department at Kroger back in the day, and I wanted to share with you something my old boss showed me: Take 1 pound of bacon for every 5-6 pounds of deer meat you plan to grind for burgers; cut the bacon into 1 inch pieces and freeze until firm. Mix this in with your chunks for the grinder, and Voila! yummy venison bacon burgers! I always liked venison, but not the "deer burgers" my husband was so in love with, but now, well, I cannot get enough of these! Again, Jen, thanks TONS!!!
Those are some really great pictures you have posted along with the instructions. I haven't done much hunting in my life, but I know that I would like to get some food from it when I do. Though seeing these photos reminded me how squeamish I can be. The end result or the raw meat is fine, but I'm not sure I could do the process from start to finish myself. It is nice to know that I have the option of someone else doing it for me.
http://www.custombutchersmokehouse.com/services.html
Impressive list! You're giving so much of information. Thanks for the post...keep it up.
Deer Meat cuts in Pennsylvania
Thanks so much! Really helped me understand the process much better, and love all the tips and tricks!
Post a Comment