Sunday, April 24, 2011

How to Process Chickens at Home

 With the rising cost of food and especially meat, many people are looking to closer to home to start raising their food. Backyard gardens are on the rise, and many people are starting to raise their own chickens for eggs. Meat chickens are one meat source that can be raised with minimal space (compared to say, a cow), convert feed efficently, and can be processed at home with not much more than a sharp knife and a big pot. 

This post will go through all of the steps to process a chicken at home.


Obviously, this is "graphic". If you aren't here to see how meat is made from a living animal, stop here and go check out another blog. If you are anti-meat, stop here. If you can't stand the sight of anatomy, stop here. If you are not interested in how to process a chicken, stop here.

Ok.

Here's a shot of some of the meat birds. They are cornish cross from Tractor Supply. They are seven weeks old, about the average age of all the chicken you get in a store. They are fed a 20% protein feed, no medication/antibiotics/hormones etc. These guys eat a LOT - in seven weeks, one dozen consumed about 200lbs of feed. They need a lot of water as well, close to the end, the dozen was consuming about 3 gallons a day.


First step not shown is getting your chicken. These guys are lazy and don't really run much. Pick them up and carry them to your designated slaughter spot. My spot is in the garage, with a rope hung from a gambrel pulley. The rope has a loop at the end, which I double around to make a noose of sorts that slides easily. I place the chicken's feet in the noose, and gently lower them to hang. Chickens will stop struggling and hang limp when upside down.

Find the jawbone of the chicken on one side. I use a scalpel, since it's the absolute sharpest blade I can get. You want your cut to be fast and quick, for minimal suffering to your chicken. Think about if you cut yourself on a very sharp knife - the pain doesn't start for a few minutes. In the chicken's case, in a few minutes, they will no longer be alive to have that pain. Cut deep enough to slice the artery, but not so deep you cut the trachea. I hold the scruff of the chicken to make the skin tight against the throat - not choking him, but snug.
 I do one fast slice, and then lower the chicken into a contractor bag inside a bucket that has some heavy stuff in the bottom. This way, they are placed in the dark, they don't struggle, and they will pass away without panic. At the end of their life, when blood loss is nearly complete, muscle spasms will occur. The bucket keeps blood and whatnot contained.
 I like to wash off the chicken to remove the blood and any dirt or poo. I find it makes the scalding not have the stink many complain about.
 I keep my scald water on the stove, in an old water bath canning pot. I fill about 2/3 full, and then squirt in a good squirt or two of dish soap. This helps work into the feathers to loosen, and also keeps the smell down. I find the prewash with the hose helps heat transfer, so I lose less heat when scalding, which means less time to bring the water to temp. I aim for about 150 degrees, and check the water temp between birds.
 I do one bird at a time. Put him in the water, and use a pair of tongs to swish him around. You want all parts of him to get nice and warm. The water temp is also not high enough to burn you, or cook the meat.
 Scalding is done when you can grasp a wing feather and it pulls out, instead of pulling the bird out of the water. This is usually under a minute.
 Start plucking. Feathers will slide right out, I like to go against the grain of the feathers to really get them out fast.
 You can take feathers by the handful.

 
The wing feathers are little, just slide them off. I don't do a perfect pluck, just get the majority off. I will do a final go over when I wash the bird after gutting.
 
The feet have a skin on them, that can be peeled off. Feet make a good stock.
 
One cleaned off foot.
 Find the joint at the hock, and place the blade there. You should be able to cut right through. If you are struggling, you are too high or too low.
 
Once the cut is nearly through, cut from the bottom of the joint.
 
The feet come off.
Cut along the back of the neck....
All the way from the base of the head to the back.
 Slide the skin up on the base of the head, and cut the head off at the base.
 
 Peel the skin off the neck and the "tubing", and then cut off the neck skin with the head attached. Leave the tubing to keep food from coming from the crop out.
Peel the tubing - esophagus and trachea - from the neck.
 Turn the chicken over, and separate some of the skin off the breast. The crop is stuck to the skin and the breast meat. Work it off both, so there is a sack attached to the esophagus, and then the tubing going into the body.
 Can see the lumpy crop with food in it here. I'm working it off the skin.
 Completely separated crop. If you leave the esophagus intact, food and such won't come out. I like to feed my chickens a bit before slaughter, so there is stuff in the crop. You don't have to, but it can get tricky to initially peel it. With food in it, you can grab it and work it apart.
 I'm pulling apart the crop and tubing, there are bits of meat/glands attached. Just peel them off. I have the neck bent to the side (left). Cut the tubing off as deep down as you can, but be careful not to slice the breast meat.
 Put the bird back up again (breast down), and find a good spot to cut the neck off. I just use my scalpel - young Cornish birds don't have a lot of hard bone. I actually use a scalpel all the way through, no other knives.
 I'm starting the cuts to gut the bird. They have pelvic bones, and I use these as a guide for my first cut. I cut toward the bone, so I can open the bird up without cutting the guts.
 I make another cut on the other pelvic bone, so I have two slits, one on each side, and about 1" or so wide.
 I work my fingers in carefully and use the knife to open up the two holes until I open the gut cavity. Once I have both holes open, I just connect them by cutting the skin.
 Find the end intestine that comes out to the vent. Loosen it off the gut cavity.
 Cut around that tube by cutting around the vent.
 I usually cut the tail off here at this point.
 Reach in and use your hand to slide around the gut cavity, loosening up and tearing off the thin membrane that holds everything to the body. Be fairly gentle, so you're not ripping into the guts.
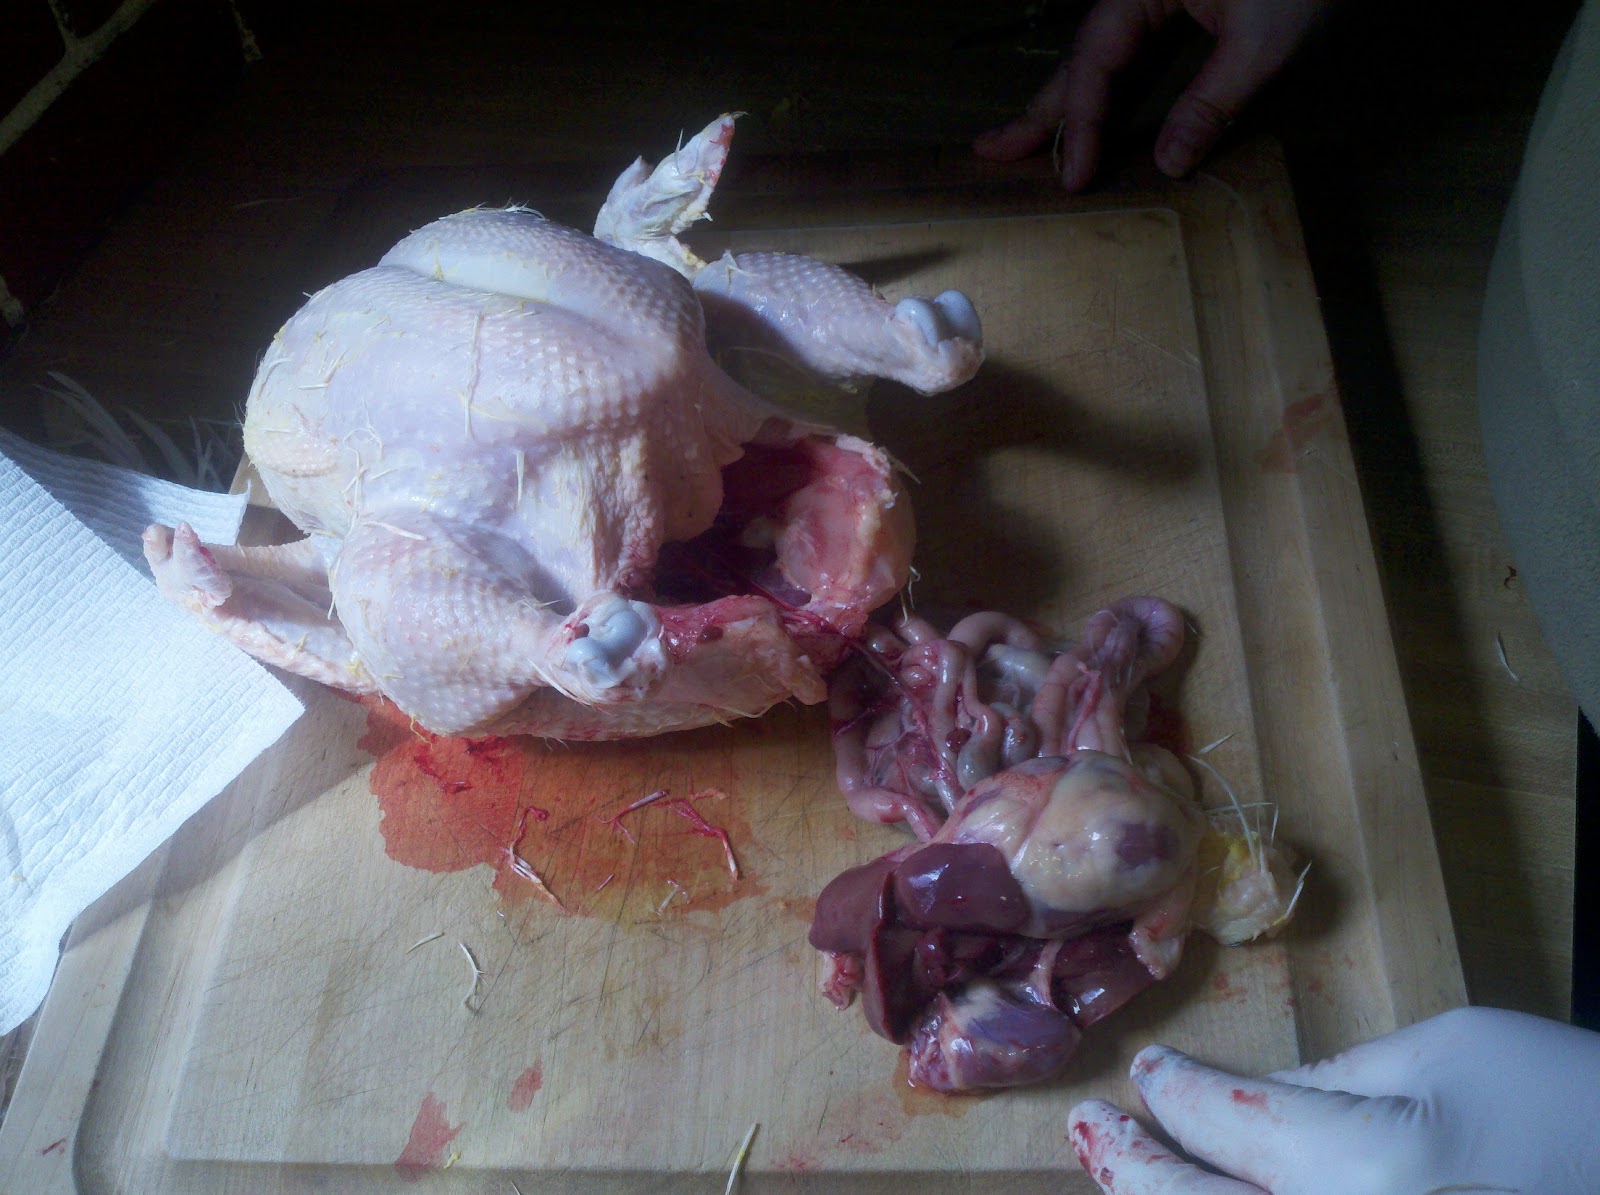
 Reach to the front, and grab the heart and just pull everything out.
 The lungs also need to come out. They are wedged between the ribs sort of in the middle. They are the bright red parts in this picture. I use my finger and slide it between the ribs, and pry them out. There are special tools, but I find I can pop them out with my fingers fairly easily. You can also see the "beans" - they are the cream colored bean shapes.This is a young rooster.

 All of the parts. The lungs are on the lower left. You can see the ridges where they sit in the ribs.

 At this point, you can throw out all of the parts, but many bits are great for stock. To use the liver, you need to carefully remove the gallbladder. It's a greenish/blackish pod, and is stuck to the liver. Carefully cut it's base out and remove. If you rupture it, immediately remove and wash off the liver.
 I'm holding the gizzard. This is the big and HARD thing in the gut cavity. It's hard to mistake it for anything else.
 To prepare the gizzard, just cut in half...
 Open it up....
 And then peel the yellow membrane off.
 Innard parts - top is lungs, then heart below them, liver to right of the heart, gizzard and then gallbladder next to it. At the bottom are the intestines. This was a boy rooster, so his cojones are on the top to the right of the lungs. These look like white beans, and are stuck to the back. If you have an older rooster, these can get big, over an inch long.
 One last step is to remove the kidneys. I find the easiest is to "scramble" them with my finger, they are buried almost in the back bone. When I wash the bird, I'll flush the bits out with water.
 Washing the bird :) I use this time to really clean up any stray feathers.
 Clean bird.
 Finishing touches. I like to use the back skin to hold the legs together to keep it easy to pack him up. Just cut a hole in the skin, about 1" up from the edge. It only has to be about 2" wide.
 Making the cut....
 Tuck the legs into the skin hole to truss them up.
 For extra fancy, flip the wings back to tuck them.
 Trussed up and ready to pack!
 You can use freezer bags. I love my Foodsaver, and these guys fit perfectly into the large rolls. I think they store better as well.
 At this point, the bird should rest in the fridge. You don't want to cook them right away, you need to let nature do it's thing and let rigor pass. If you grab a leg and it's not moving easily, it's not ready to cook. I let them rest in the fridge for 2-3 days, and then put them in the freezer until I'm ready to cook them.

When doing this the first time, expect about an hour of work. You'll get faster over time, some folks can do everything in about 15 minutes or less per bird, and there are many tools (such as pluckers) that can really speed things up. However, this is just to show that you can process a chicken with no more than a pot and a sharp knife.

Sunday, October 10, 2010

Wild Dinner

If you know me, you know I hunt, and I eat what I hunt, with great gusto. If you know hunting, you know the biggest complain is that game meat is tough and tastes horribly strong.

First off, "store meat" is generally made to have about zero flavor -which makes it good for cooking because it takes the the flavor of whatever you're cooking. I'm not that big on store meat.

Most wild game falls in the red meat category - even birds like goose and duck. (Turkey does have white meat). The trick is to treat it like red meat, with some extra care. Be kind to it!

And BRINE it.

Right now we are in the midst of heavy duck hunting, and wild duck can be some mighty tasty stuff. The first thing to do is take the meat (you can pluck them if you realllllly want to, we cut the breast meat out, which is that massive majority of the edible meat on them), wash it, and check for any shot. Remove blood clots, and just check all over for yuck. It should like like a hunk of red meat :) I like to give it a nice soak in ice cold water in the fridge for a few hours, then you can pack it and freeze it, or, if you're going eat today, brine that stuff.

Brining isn't hard. It's just sugar, salt and water. Sometimes I get fancy and use BROWN sugar, but sometimes just regular sugar. You want about one cup of sugar, one cup of salt (I use canning salt because it's cheaper) and a gallon of water. You'll want to leave the meat in there for at least an hour, preferably more, up to a day. If the brine gets really bloody, change it out for fresh (the ice water soak should help this.)

When you are done brining, you want to give the meat a quick rinse and THEN go to whatever marinade you want if you plan on a fast cook, or just prep it as you normally would for stew, chili, pot roast, whatever.

Today was duck day, and I brined it for about 4 hours, then made a simple marinade of crushed up mango (thawed from frozen), apple cider vinegar and some ground pepper. I let it sit for about an hour in the fridge, then placed the duck breasts in a hot pan with a little bit of oil. I poured the marinade all over, and let it simmer away, adding about another cup or two of frozen mango. I turned the duck over once, and I would guess it cooked at a simmer for about 30 minutes - a kind of braising. Usually duck is served rare-ish, but I'm not up to watching it that closely, and besides, I'm the only one in the house that eats meat rare - majority rules.

After about half an hour, the mango simmered down to a thick sauce, and the vinegar flavor had cooked off. We were left with some really tender duck breast with a tart fruity sauce. Even the kiddo loved it :) Didn't even have to use a knife to cut it!

Monday, July 26, 2010

Chicken Dinner Time!

First off, this is not how chickens are mass slaughtered, if you want nightmares, go watch Food Inc. While the following may seem mean or strange if you aren't used to raising your own animals for food, understand this chicken was raised with all the food and water he could want, a large coop and run, and daily free range time to stalk the yard.


Back in April, I chose to purchase straight run chicks from TSC, with the intention of having the hens for eggs and eventually the roosters for dinner. I ended up with 3 Silver Laced Wyandotte (SLW)roosters and a Rhode Island Red rooster (with a second RIR that is suspect).

I decided to let them decide who would be dinner, based on how they act - I have a small kid, and no mean roos allowed. Yesterday, one of the SLW decided to start following my daughter with that "look", so into the dog crate he went, and today, he went to rooster heaven smile  He was also harrassing the daylights out of the hens, and one of them has had a lot of feathers pulled out from him. He needed to go. I was hoping to get to that 20 week mark, but that's just didn't happen with this dude.

The 20 weeks is based on hertiage breed chickens for meat. Long ago, we didn't have crossbred chickens that grew at astronomical weights in a short time, we had plain ol chickens that laid eggs. Today, most purchased chicken is the Cornish cross, a hybrid that usually must be slaughtered at 8 weeks or so due to health problems with incredible weight gain.

This is a neat article about what chickens used to be like, and this is what I'm raising - chickens that are not bred to be dinner at two months old, but rather bred to be chickens that lay eggs and provide meat, ala how chickens were long ago. http://www.albc-usa.org/documents/cookingwheritagechicken.pdf

Anyway, here is the convict:
http://www.backyardchickens.com/forum/uploads/54632_deathrow.jpg


My bad picture of my very, very simple "tree of death" - a rope tied around the tree that I had hubby make a slip knot on the end, and a separate rope that I had him also make a slipknot in. Yes, it is hot pink smile I couldn't find "normal" rope - I normally use it as a line for pulling my bow into tree stands. It's sturdy,
http://www.backyardchickens.com/forum/uploads/54632_treechicken.jpg

I got the convict out of his cage, and quietly carried him to the tree of death, and slipped his feet in the noose. I put the second one on his head. He is alive in this picture. Chickens have a tendency to just chill out/pass out almost when gently placed upside down. They will stay like that.
http://www.backyardchickens.com/forum/uploads/54632_hanging.jpg

I have a scalpel and scalpel blades, which I chose to make the neck cut, as they are by far sharper than anything else here. I chose to cut his jugular/cartoid artery to bleed him out. He didn't move for a few seconds or more, then start flopping a bit. I let him hang for about 5 minutes while I checked on my scald water. When I returned, he was still.

I brought him to the inside "station", my kitchen, where I had a pot of water with some dishsoap at a good temp (148F), and one side of the sink with icewater. The counter had been washed and then a bleach solution wiped on to let dry, same with the cutting board. I tied a bag to the handles of my drawers for easy trash smile
http://www.backyardchickens.com/forum/uploads/54632_kitchenchix.jpg

I dunked and swished a few times, until I could pull out one big wing feather easily, then I put him in the ice water and swished. He then went into the same bucket I used to carry him in the house, and I took him outside so I could pluck him where stray feathers wouldn't be worrysome.
http://www.backyardchickens.com/forum/uploads/54632_bucket.jpg

The wing and tail feathers needed some oomph to get out, but the rest came out with a gentle "rubbing" motion, against the lay of the feathers.
http://www.backyardchickens.com/forum/uploads/54632_halfplucked.jpg

I got him mainly done and then just put him in the sink underwater and finished the bits of feathers out..
http://www.backyardchickens.com/forum/uploads/54632_finalpluck.jpg


I'm not sure on his size, but I'm guessing at least 3lbs, maybe a wee bit more. I think I have a fish scale somewhere, have to find it. For ease of brining, I stuck him in a gallon pitcher which he just fit in, and filled with salt water to brine. We may have him for dinner tonight.

http://www.backyardchickens.com/forum/uploads/54632_finalchix.jpg

And that's what a 15 week old non-grocery store breed  rooster looks like smile Total time from catching to fridge was about one hour.

Friday, July 23, 2010

Pickles Pickles Pickles!

Tis the season! I've had a few requests for my recipes, so here are three. Got them from Recipezaar, tweaked, and somewhat made them my own :)

The Best Dill Pickles EVER

* 7 wide-mouth quart jars, lids & rings
* fresh dill, heads & several inches of stems shaken free of bugs and rinsed off
* cucumber, washed, scrubbed (test pack in the jars before cleaning, to get an idea of how many - this particular recipe is for 7qts)
* bag of ice
* 14 garlic cloves (or more)
* 8 1/2 cups water
* 2 1/4 cups white vinegar
* 1/2 cup pickling salt

Wash the pickles the night before, and then fill the sink with cold water, the bag of ice and the pickles. Let sit - if you feel like it, add more ice through the night -just want to keep them cold! Makes them crisp

Wash and sterilize the jars, put the lids and rings in a pot of boiling water. Put the water, vinegar and salt in a big pot, bring to a boil.

Put a clove or two of garlic at the bottom, with a head of dill, then pack the cucumbers in. Put a clove of garlic on top, some more dill, and then pour the brine on top to fill to 1/2" from top of jar.

Cap snug (not super tight!) with lids and rings. Put in a water bath canner, fill with water to cover the lids, and bring to a boil. When steam rises, put the lid on, and time for 15 mins.

Remove from the bath, tighten the lids hand snug, and let cool.

Let sit for at least 6-8 weeks

I like to put in some extra dill and garlic - at least 3 cloves and 2 dill heads per jar. If the cloves turn blue over time, it is OK, its some oxidation thing, not a worry. The only time you shouldn't eat is if they don't seal (fridge and eat within a week or two) or the seal comes up over time (throw out).

Microwave Bread and Butter Pickles
Stupid easy and fast!

*NOTE!* This is NOT a preservation canning method. These do need to be refrigerated after being made, and consumed in a reasonable amount of time, couple weeks or so.*

* 8 cups cucumbers, sliced 1/4" or less, your preference
* 3 cups onions, thin sliced
* 4 cups sugar
* 2 cups white distilled vinegar
* 4 teaspoons salt
* 2 teaspoons mustard seed
* 1 teaspoon celery seed
* 1 teaspoon turmeric
* 3 quart canning jars with rings and lids

Mix all ingredients together (I like to keep the cukes and onions apart until I get everyone else mixed together, it's easier. The sugar will NOT dissolve, so just get it all blended together. Once it's blended, put the cukes and onion in and toss a bit.

Put it all in a large microwave safe bowl, microwave for 3 minute sections, stirring each time, usually for a total of 9 or 12 minutes, depending on your microwave. You the onions to be limp and close to translucent, but the cukes to still be firm.

Place in clean canning jars, wipe the rim, lid, and let cool, put in fridge when cool and eat!

Sweet Pickle Relish

I've been told by folks that don't like relish that they like this stuff a lot. My dad eats it with a spoon out of the jar...not sure I'd go THAT far! It is yummy, and good for overgrown cucumbers that aren't good for pickle making. I forgot how much this makes, guess 10 pints or so? 12?

* 8 cups cucumbers, deseeded and chopped
* 4 cups onions, chopped
* 4 cups bright colored bell peppers chopped
* 1/2 cup canning salt
* 7 cups sugar
* 4 cups apple cider vinegar
* 2 tablespoons celery seeds
* 2 tablespoons mustard seeds


To deseed cucumbers, cut them in half lengthwise and scoop out the seeds with a spoon

I chop all the veg up to a coarse chop with the food processor. You want 1/4" chunks or so. Put all the vegetables in a large bowl.Sprinkle the salt over the chopped vegetables. Cover with cold water and let stand for 2 hours.

Drain vegetables well, then press out as much liquid as possible. I like to put them in cheesecloth and wring the daylights out of them.

In a large pot, combine sugar, vinegar and seeds. Bring to a boil. Add vegetables. Bring back to a boil and simmer for 10 minutes.

Using a slotted spoon, put into pint jars according to standard canning procedures. Once the jars are pretty full of relish, use a regular soup ladle to add the brine, this way they aren't soupy.

Process in a hot water bath (10 mins). Let cool, the lids should pop. As long as the lids don't pop up, they are good for at least a year. If they don't seal right away, use soon, if they pop after time, throw out.

Sunday, May 23, 2010

Strawberry Jam

I posted this about a year ago, bringing over here to share as well for easy access...

How to Make Strawberry Jam

...at least how I do it!

Ingredients are 9 cups of hulled, clean strawberries, 4 cups of sugar, and 1/3 cup of lemon juice.

I start by well, picking my berries! These are all from my garden:


I like to just dump a batch into a bowl, fill with water, and rub the dirt off. If you don't get all crazy, the dirt settles to the bottom, and the berries all float. I just cut the top off with a knife. I put them in a colander on the other side. I also check for bad spots and cut those out.


After I cut them all up (do the whole batch that is in the water at once, so they don't get waterlogged - if you have to leave them, take them out of the water!), I measure out 9 cups and put them in my big ol' pot. I got it for about $5 at the dollar store - it's just a cheap steel pot. It's awesome. You want a BIG pot, and you'll see why later....


Take a potato masher and just mash the heck out of them, depending on how big of strawberry "chunks" you want. They will break down more. If you want perfectly smooth jam, then measure your whole berries, then run them through the food processor. I like some chunks. Put them on medium heat and let them come to a simmer. Add the sugar and lemon juice. I can't remember if I've added the sugar and lemon juice here, but you can see the texture kind of...
I don't use pectin or anything, so now is the fun part, the boiling. Bring it up to a full boil, and just stir regularly, every couple minutes. This is after a few, maybe 5 minutes:


And now it's REALLY boiling. THIS is why you want a tall, big pot. They are boiling at 2-3 times the "height" of just the berries. I still have lots of room to spare.


This is probably 15 minutes of boiling, at the same heat. Notice how there is some red showing, it's not just pink juice boiling like mad:


This is something like 20-30 minutes (I don't really keep track). This is where you want to stir it regularly. I have JUST taken it off the heat, but it pretty much looks like boiling, thick goo, and the foam is just on the sides. If you stick a spoon in and drip it onto a cool plate and hold it vertical, the drops of jam will slide and then stop. I like to test again by pushing a line through the jam on the plate with my finger. If it doesn't move, it's done

Skim off the foam - you don't have to get all crazy, I just use a wide, shallow ladle, and tap it onto a plate with paper towel, and wipe the ladle until all the foam is gone.


I don't have skills to show putting the jam in, but I just have a cheap plastic funnel that you can get in the canning section of the store, and fill my clean jars by setting the funnel on the top, and then ladling the jam in with a clean ladle. I always clean more than enough jars - having not enough is NOT FUN. You want to put your jam in ASAP - while it's HOT - so that when you water bath it, you know it's getting up to a hot, good temp.


Wipe the tops of the jar with a clean paper towel, put the clean lids on, and put the rings on just snug, and put them in the water canner! Fill with water til it's well over the lids (I go for about an inch). Hint - fill with the hottest tap water you can get out of your faucet ) Bring to a boil - enough that there are bubbles coming up and steam. Then put the cover on it, and set a timer for 15 minutes. When the 15 is up, carefully remove the lid, and use tongs to lift the jars out. Place them on the counter on a towel. I like to then carefully, with a towel over the top, snug the lid down again. You don't have to get all crazy, just hand tight. The heat and cooling will seal against the lid. You should hear them "pop" when cooling. After they are completely cool (I wait all night), check by pressing the lid. If it pushes down and springs back, you have to reprocess, or just put in the fridge and eat within a couple weeks. If it doesn't move and is all the way down, then it's good to store for a long time, at least a year. I like to check them every few months to make sure the lids are still down. If they pop back up down the road, then just get rid of it, don't eat it.

Jam!


Also, do not try to double canning recipes that require it to "set" like jams or jellies. It won't work. Do batches (thats why I have extra strawberries in one picture).

I personally don't use pectin because, well, I never remember to get it, and two, I prefer the SUPER taste - the boiling reduces the berries down and their natural pectin makes the jam - so you end up with a "concentrated" fabulous strawberry taste. It's amazing - like NOTHING you can get in the store. It also helps that I'm using ripe, just picked berries as they have a whole lot of flavor. Using pectin is faster as you don't have to boil nearly as long, but then you end up with not quite as concentrated flavor. There isn't anything wrong with pectin, I just prefer to take a few minutes longer and get that stronger flavor. There is also the pain of pectin when it doesn't decide to set for whatever reason, and you end up having to reprocess your jam (did this my first year with blackberry jam).

Enjoy!

Friday, March 19, 2010

Time for Taquitos!


http://www.recipezaar.com/Beef-Taquitos-Oamc-81118

Because as usual, I can't follow a recipe for my life, I changed it :) First I used chicken - a whole one that I had cooked all day in the crock pot, and then decided to not have for dinner. I pulled out all the meat, and put in the fridge. I then picked it apart, so no bones or yuckies, and chopped it fine. I added the spices, and a can of diced tomatoes with chilis.

I heated a skillet with my fav, Crisco, so it had a thin layer of oil. I would place a tortilla in the oil for a minute or two, take it out with tongs, place on a paper towel oil side down, and put 1/2 cup of the chicken mix. I would use the paper towel to start the roll, and roll tightly, then place seam side down on the same pan - I had enough room to heat a tortilla and cook one seam down at the same time. As I was cooking the finished tortilla, I would heat a new shell in the oil, make it up, and then place on the pan, taking off the one that had been cooking, and placing in a dish. I made about thirty taquitos, and then just placed the whole shebang in the freezer. The next day (today, haha!) I took them out, and tapped the dish so they separated, and bagged them up. Of course, I had to have a taste test, so I popped two in the microwave in a paper towel, heated for 1.5 minutes, and TASTY!!!

As they don't seem to stick while frozen, I now have snackies for whenever I want!